How you can Add a Rain Impact in Photoshop

On this tutorial, you will learn to add rain to a photograph in Photoshop. This straightforward method can simulate every kind of rain, from gentle drizzle to a heavy downpour. With somewhat tweaking, you possibly can even use it to make snow! After I’m questioning easy methods to change the climate in Photoshop, that is all the time my go-to.
And do not forget to take a look at the brand new video and observe alongside on the Envato Tuts+ YouTube channel:
How you can Add a Rain Impact in Photoshop
Step 1
The very first thing we have to do when making a rain impact in Photoshop is to make a rain texture. Let’s create a New Layer and fill it with strong black. Identify this layer “Dots.”
Go to Filter > Pixelate > Mezzotint, setting the Sort to Coarse Dots.
Pixelate > Mezzotint, setting the Sort to Coarse Dots.” loading=”lazy” width=”870px” top=”976px” class=”resized-image resized-image-desktop” srcset=”https://cms-assets.tutsplus.com/cdn-cgi/picture/width=1700/uploads/customers/1990/posts/108554/image-upload/_0001s_0006_1.jpg 2x”/> Step 2
Now, we’ll Zoom in shut and go to Choose > Colour Vary. Right here, we’ll click on on a white dot and set the Fuzziness to 200. Press OK. That may choose the white dots so we are able to add a Layer Masks and masks them.
 Step 3
Subsequent, let’s enter Choose and Masks, discovered within the Properties panel when a variety instrument is energetic.
In World Refinements, set the Feather to 2 px and Distinction to 50%. Press Okay.
This may skinny out the dots. The extra seen the dots are, the heavier the rain will seem, so be happy to play with these settings.


Step 4
We’ll Duplicate the “Dots” layer twice utilizing Management/Command-J for a complete of three dot layers.
Choose all of the dot layers and Proper-click > Merge Layers. This may make the dots seem stronger.
As a result of we’re working with a portrait, I’ll enhance the scale of the dots utilizing the Remodel instrument.
The quantity you enhance the scale will depend upon how shut or massive you need the raindrops to look.


Step 5
Go to Filter > Blur Gallery > Path Blur. Stretch out the blue blur path so it is vertical.
Subsequent, we are able to create variation in motion within the rain by inserting two factors on the trail and pulling them in reverse instructions.
You all the time need your rain to be stepping into multiple course, even when it’s totally refined. Finally, we wish the rain to be vertical, however including a slight wave will give us a extra natural impact.
This brings us to Motion Velocity. If we wish a full-blown downpour, 50–75% works nicely. Nevertheless, we wish a extra photographic-style rain. So let’s deliver the Motion Velocity all the way down to 20–25% and press OK.
 Step 6
Let’s Duplicate this rain texture a pair extra occasions to make it seem stronger after which Proper-click > Merge Layers once more.
That is going to be our base rain impact texture. The way you edit this texture will depend upon the impact you need and the picture you are making use of it to.
I extremely advocate making a replica of this rain layer so you need to use it time and again, and never must remake it.
 Step 7
Layer the rain in entrance of and behind your topic. You can too modify the brightness, measurement, and colour of the rain textures as wanted.
Let’s take a look at easy methods to modify the colour. The best choice is to go to Picture > Changes > Hue/Saturation and test Colorize. Right here you need to use Hue and Lightness to regulate the colour of your rain. Under, I added a slight inexperienced hue.
We will additionally change the Layer Modes. I wish to experiment with combining layer modes like Overlay, Smooth Mild, Colour Dodge, and Display screen.
I by no means advocate pure white rain.
 How you can Make Hair and Garments Moist in Photoshop
Step 1
The next steps are non-compulsory. When you have a topic with garments and hair, this is how one can make them seem moist from the rain. First, let’s begin with the hair. Extract your topic utilizing your most well-liked methodology; I like Choose Topic and a Layer Masks.
Use the Smudge instrument to smudge the hair. We would like the hair to look heavy and moist, not fluffy. Attempt to take away any flyaway hair strands as nicely.
Create and Clip a Brightness/Distinction layer into the topic, setting it to Distinction 100. Use a Layer Masks to take away the Brightness/Distinction layer from in all places however the hair.
If wanted, use a Vibrance adjustment layer to take away some saturation from the hair, as including distinction can generally oversaturate pixels.


Step 2
Subsequent, create and Clip a Curves layer above the Brightness/Distinction layer, citing the highlights. Use Mix If to focus on the highlights of the hair.
Use a Layer Masks to take away the Curves layer from in all places however the hair. This may deliver out the highlights within the hair, making it seem moist.
Maintain Alt to separate the Mix If toggles.


Step 3
Create and Clip a New Layer into the topic, setting it to Smooth Mild. Use a semi-soft spherical Brush with Moist checked within the Brush Settings to color moist spots on the excessive components of the garments—on this case, the chest and the leg of the costume.
Use a number of layers to slowly construct up the moist look. Regulate the Opacity of layers as wanted.


Step 4
Create and Clip one other Curves layer above all present layers within the topic. Enhance the highlights, and use Mix If to focus on the highlights within the picture.
Invert the Layer Masks utilizing Management/Command-I, turning the layer masks black. Masks within the curves layer over the moist components of the topic—on this case, her leg and chest.


Step 5
Repeat the above step till you will have a vibrant sheen on the topic.


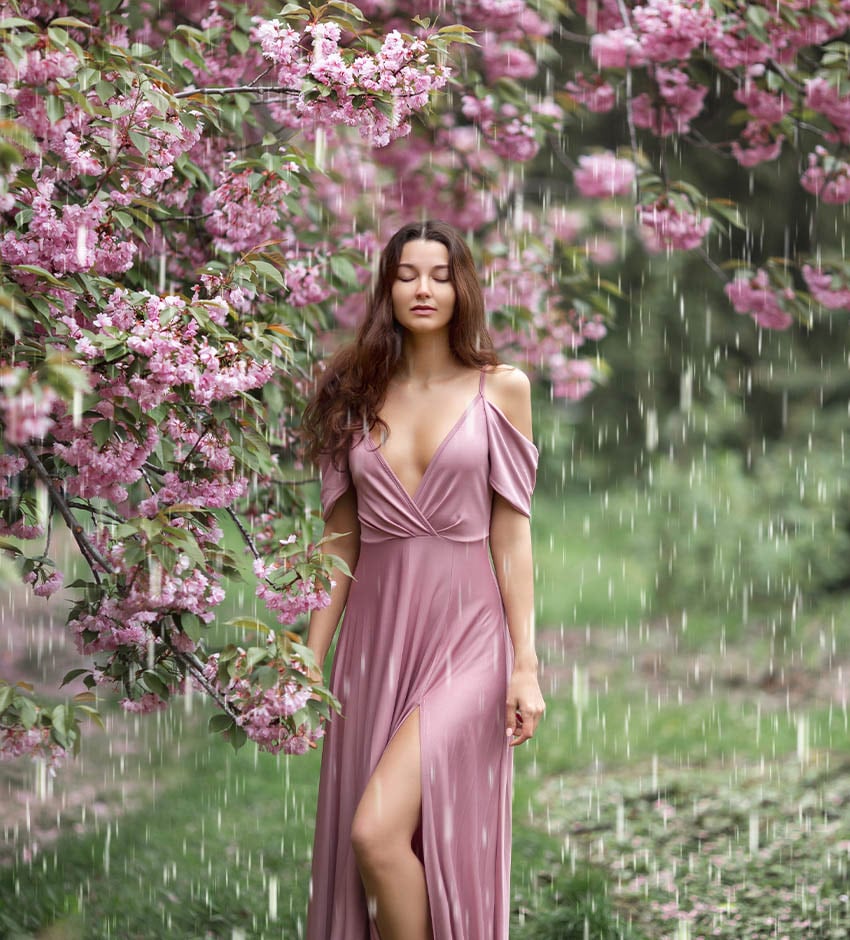
That is How you can Add a Rain Impact in Photoshop!
That is easy methods to add rain to a photograph in Photoshop! Strive saving every rain texture you create so you possibly can add rain shortly in future, with out having to make the identical texture time and again. And hey, why not mess around with different climate results too? Give snow a shot utilizing the identical method! Simply make the rain a bit thicker and add much less Motion Velocity, and you will get an on the spot snowstorm.
For those who like utilizing Photoshop to create rain results, do not miss out on AI picture mills. They can assist you generate photos with particular results. Take a look at Futuristic Employee for extra info on prompting Midjourney to get cool rain results and rather more.


In search of Extra Photoshop Climate Results?
For those who want much more Photoshop climate results, check out among the superb rain overlay Photoshop property from Envato Components.
Sensible Rain Stamp Brushes (ABR, BRUSHSET)
These are among the finest rain brush Photoshop property you will discover. This brush pack comprises ten high-resolution and lifelike rain brushes that every create a distinct sort of rain impact. From a straight downpour to a windy rain, it is all right here!


Rainstorm Photoshop Motion (ABR, ATN)
Wish to create a downpour instantly? This rainstorm Photoshop motion is ideal for you. The impact is non-destructive and customizable, so you will all the time have the ultimate say on how your picture seems. It is the right rain overlay for Photoshop.


Rain Animation Photoshop Motion (ABR, ATN, PAT)
Add a contact of drama to your sports activities photos with this on the spot motion. With only a click on of a button, a stylistic Hollywood-inspired rain impact can be added to your photographs. By no means marvel easy methods to add wet climate in Photoshop once more.


8 Rain Photoshop Brushes (ABR)
That is easy methods to change the climate in Photoshop shortly. This rain brush Photoshop pack is a favourite. Shortly add rain to any scene with a click on of your mouse. It comes with eight brushes that each one have gentle edges for simple mixing. At 5000px in measurement, these brushes are high-resolution.


Rain on the Glass Picture Impact Mockup (PSD)
Wish to learn to add wet climate in Photoshop instantly? Remodel your photograph right into a rain-kissed masterpiece with this rain-on-the-glass impact. Merely drag and drop for a contact of realism. Expertise a novel and lifelike rain texture for that good rainy-day vibe in your photos.


