Tips on how to Make Grand Theft Auto Cowl Artwork


 What You may Be Creating* { box-sizing: border-box; } physique {margin: 0;}*{box-sizing:border-box;}physique{margin-top:0px;margin-right:0px;margin-bottom:0px;margin-left:0px;}
When you’re impressed by the brand new Grand Theft Auto 6 trailer, on this tutorial, you will discover ways to create the enduring GTA cowl artwork in Photoshop. I’ll clarify every little thing in a lot element that everybody can create a GTA background, even those that have simply opened Photoshop for the primary time.
What You may Study in This Grand Theft Auto Cowl Photoshop Tutorial
- Tips on how to make a GTA cowl template
- Tips on how to create GTA 6 cowl artwork photograph look
- Tips on how to make your individual GTA cowl artwork
- Tips on how to create GTA cowl artwork textual content
- GTA 6 poster maker actions
What You may Want
To recreate the enduring GTA background, you have to the next assets:
- Pricedown Font
- Picture of Two Mates at a Social gathering
- Girl in a Beige Coat
- Brown-Eyed Man and Girl
- Spending Time on the Quayside
- Good Time With Grandfather
- Spending Good Time Outdoor
- Trendy Tattooed Man in Hawaiian Shirt
- Portrait of a Couple
- Greatest Mates Making a Self-Portrait
- Good Relationships
- Completely happy Household on the Seashore
- Group of Mates Having a Picnic on the Seashore
1. Tips on how to Begin Making a GTA Cowl Template
Step 1
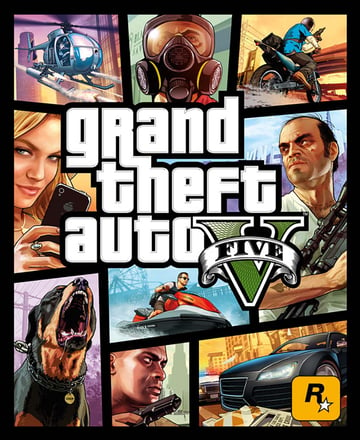
Have you ever ever considered making a GTA 6 cowl template along with your photographs? That’s precisely what we’re going to do on this tutorial. We’re going to create the GTA cowl artwork with photographs of our alternative (which implies you should use your individual photographs as effectively). Earlier than we get began, let’s shortly try an authentic GTA cowl photograph:


Step 2
As you’ll be able to see from the screenshot above, what we’re going to must recreate the GTA background photograph are the precise cartoon-style photographs, textual content with an impact, and a pleasant body to put every little thing into.
We’re going to begin by choosing up the photographs. When you’re on the lookout for inventory photographs, try Envato Parts, the place you’ll be able to select from almost 5 million photographs. Search for photographs that aren’t closely edited as we’ll have to use our personal results to them later. Right here is my alternative:


Step 3
Now that we have now our photographs prepared, we have to apply the GTA artwork type impact to them. For this, you should use the GTA V motion, or try the GTA Picture Impact tutorial:
Step 4
Save all the outcomes as PSD information. Listed below are my outcomes:


2. Tips on how to Make a GTA Cowl Template
Step 1
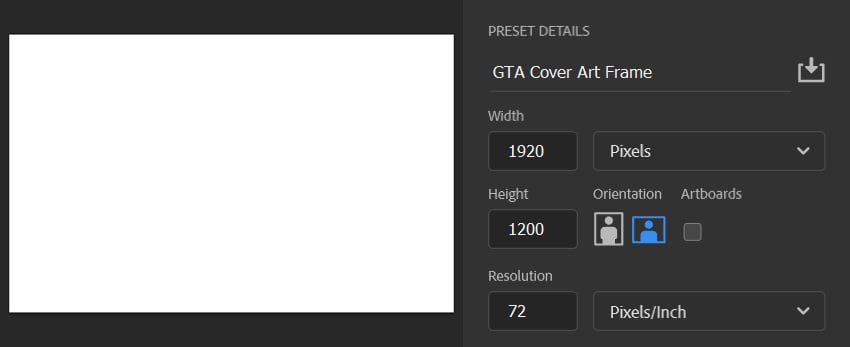
On this part, we’re going to create the Grand Theft Auto cowl body to put our photographs into. First, create a brand new file. Go to File > New, and set the Width to 1920 px, Top to 1200 px, and Decision to 72 px/in.


Step 2
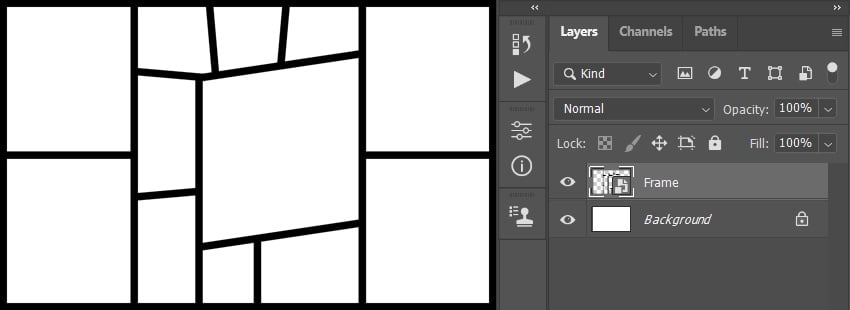
Now select the Line Instrument (U), setting the Fill Stable Coloration to #000000, Stroke Stable Coloration to #000000, and Stroke Width to 28 px. Then, click on and drag to attract the body for the primary photograph. Be at liberty to attract utilizing as many line layers as you want.


Step 3
Repeat this step to attract the frames for the remaining photographs. If in case you have used a number of layers, choose your high line layer, and Shift-click on the underside line layer to pick out all line layers between. Then, Proper-click on any of the chosen layers and select Convert to Sensible Object. Title this layer Body.


3. Tips on how to Place Pictures Into Your Grand Theft Auto VI Cowl Artwork
Step 1
On this part, we’re going to place the photographs into the body. Select the Magic Wand Instrument (W), and click on contained in the empty house the place the primary photograph shall be positioned to select.


Step 2
Now go to Choose > Modify > Broaden, and set Broaden By to 5 px.


Step 3
Choose the Background layer, and press Management-Shift-N in your keyboard to create a brand new layer, naming it Photo_1_Place. Then, set the foreground colour to #ff0000, go to Edit > Fill, and set the Contents to Foreground Coloration, Mode to Regular, and Opacity to 100%. After that, press Management-D to deselect the choice.


Step 4
Repeat these steps for the remaining empty areas. Right here is my outcome:


Step 5
Now go to File > Open, select the PSD file of the primary photograph that you simply need to place, and click on Open. Then, within the newly opened file, press Management-Shift-E in your keyboard to merge all of the seen layers into one layer, Proper-click on it, and select Convert to Sensible Object. Select the Transfer Instrument (V), and drag this layer to the body file. Place it simply above the Photo_1_Place layer within the Layers panel, and press Management-Alt-G to create a clipping masks.


Step 6
Press Management-T in your keyboard to remodel this layer, and rework it as you want. Then, title this layer Photo_1.


Step 7
Now repeat these steps to put the remaining photographs. Right here is my outcome:


4. Tips on how to Create the GTA Template Textual content
Step 1
On this part, we’re going to create the GTA artwork type cowl template textual content and place it within the body. To create the GTA impact along with your textual content, try my GTA Textual content Impact tutorial. Right here is my outcome:


Step 2
Proper-click on the GTA Artwork Textual content folder and select Convert to Sensible Object. Then, select the Transfer Instrument (V), and drag this layer to the body file. Place it on the high of the layers within the Layers panel, and place and rework it as you want. Right here is my outcome:


You Made It!
Congratulations, you have succeeded! You have now discovered how one can make your individual GTA cowl in Photoshop. Right here is our remaining GTA template outcome:


Are you on the lookout for a GTA cowl artwork Photoshop motion that can do all of the give you the results you want? Try the Grandiose 2 Photoshop Motion over on Envato Parts, the place you will discover hundreds of superior results.


With this GTA motion you’ll be able to create superior, cartoon GTA-inspired artwork shortly and simply. You should utilize your individual textual content with the GTA type, and also you additionally get the GTA 6 poster maker motion to create a GTA cowl along with your photographs after getting 12 photograph examples prepared. The motion additionally creates 11 colour appears to be like you can select from.
5 Cool GTA Photoshop Actions
Need to save time with GTA Photoshop actions? Try this record of actions over on Envato Parts, the place you will discover hundreds of superior results.
Grandiose 3 Animated Photoshop Motion (ATN)


This GTA Photoshop motion will make it easier to create probably the most real looking GTA V artwork type very quickly. You simply open your photograph, brush over your topic, and play the motion. There are 16 background shapes included, with the choice so as to add extra components to the design, like a automotive behind the topic or no matter your creativity brings, and an motion to create a GTA textual content impact utilizing your individual textual content. You additionally get to animate the outcomes just like the GTA V recreation loading display, with 20 preset colour appears to be like.
Grandiose Photoshop Motion (ATN, PSD)


Welcome to the primary GTA Photoshop motion ever created. It creates a practical GTA artwork type impact, and the textual content impact is included in addition to the GTA 6 poster maker motion to create GTA cowl artwork with your individual photographs with no work in any respect.
Cartoon & Vector Artwork Photoshop Actions (ATN)


Create 4 completely different photograph results with this set of Photoshop actions. You may select between cartoon portray, cartoon results, vector artwork, and colour halftone photograph results.
Cartoonize Photoshop Motion (ATN)


Right here we have now one other cartoon Photoshop motion. You should utilize this motion to create a cartoonish digital oil portray impact utilizing only a single click on and with none skilled abilities.
Vector Cartoon Portray Photoshop Actions (ATN)


Create a vector cartoon look along with your photographs utilizing this motion. The product is made for photographers and graphic designers, and it takes just one click on to get the impact.
Did you want this tutorial on how one can make a GTA cowl template in Photoshop? Then you might also like:


Tips on how to Create a GTA Picture Impact Motion in Adobe Photoshop
On this tutorial you’ll discover ways to create a tremendous, inventive impact impressed by the artwork type of the Grand Theft Auto online game, utilizing Adobe Photoshop.


Marko Kožokar
02 Nov 2020Photoshop Actions


Tips on how to Create a GTA Textual content Impact Motion in Adobe Photoshop
On this tutorial you’ll discover ways to create a tremendous textual content impact impressed by the Grand Theft Auto online game. It is appropriate for Photoshop novices.
Marko Kožokar
23 Nov 2017Photoshop Actions


Tips on how to Create a GTA V Picture Impact Motion in Adobe Photoshop
On this tutorial, you’ll discover ways to create a tremendous photograph impact impressed by the Grand Theft Auto V online game artwork type. Even in the event you’re a Photoshop…
Marko Kožokar
04 Aug 2018Photoshop Actions


Tips on how to Create Vexel Artwork in Adobe Photoshop With an Motion
On this tutorial you’ll discover ways to create a tremendous vexel artwork impact. I’ll clarify every little thing in a lot element that everybody can create it, even…
Marko Kožokar
02 Jan 2018Photoshop Actions


Tips on how to Create an Illustration Photoshop Motion (From Picture to Illustration)
Do you need to flip a picture into an illustration in Photoshop? That is the tutorial for you! Study to do it utilizing a Photoshop motion!
Marko Kožokar
12 Jun 2023Photoshop Actions


Tips on how to Create a Photoshop Oil Portray Impact
On this oil portray Photoshop tutorial, you’ll discover ways to create an oil portray impact Photoshop motion to remodel any photograph into an oil paint…
Marko Kožokar
17 Feb 2021Photoshop Actions
![]()
