Methods to Rasterize in Photoshop
If you wish to edit a vector picture (like an SVG picture) in Photoshop, it’s worthwhile to rasterize it. Here is how.
Adobe Photoshop is an extremely highly effective graphics editor — so in style it is turn out to be a verb in its personal proper.
When making an attempt to edit a picture utilizing Photoshop, it is simple to run into issues, particularly when these photographs are vector graphics. It’s because some Photoshop instruments solely work with raster graphics – vector graphics (like SVG recordsdata) are tougher to edit.
The excellent news is that it is fast and straightforward to rasterize a vector picture in Photoshop. You possibly can then apply any Photoshop device or impact.
If you wish to rasterize in Photoshop, this is what it’s worthwhile to do.
What’s rasterization in Photoshop?
Rasterizing in Photoshop converts a vector picture right into a raster picture. To clarify this, we should first clarify the 2 fundamental forms of digital photographs that you will notice in Photoshop.
The primary consists of a grid of pixels. The phrase pixel is a mixture of the phrases “picture” and “component” and describes a pixel completely. Every pixel is a tiny piece of the entire that collectively makes up your digital picture. A picture saved as a raster of pixels known as a raster graphic. A lot of these graphics are normally saved with the Picture file format JPG or PNG.
The second kind of picture is a vector graphic. Reasonably than a group of pixels, a vector graphic is a set of mathematical equations that outline the place and form of every a part of the picture relative to at least one one other. A vector graphic normally makes use of the SVG file format.

An instance of a non-pixelated raster graphics picture.
As an alternative of current in a hard and fast bodily area like pixels, vectors exist in an summary mathematical area. This implies you may zoom in or out with out dropping data, so the picture high quality is all the time the identical.
When a raster picture is scaled up, Photoshop has so as to add additional pixels to fill the picture, normally inflicting the picture to turn out to be blocky and pixelated.
![]()
An instance of a pixelated raster graphic picture.
Why would you rasterize a picture in Photoshop?
If vector graphics could be resized with out lack of high quality, why ought to we even have to know how you can rasterize in Photoshop?
The principle motive is that some instruments and results in Photoshop solely work with raster graphics. If you wish to use these instruments on a vector graphic, you should first rasterize it. For instance, brush instruments, fill instruments, eraser instruments, and filters don’t work when utilizing vector photographs.
Methods to rasterize in Photoshop
Rasterizing in Photoshop is fast and straightforward to do. You possibly can convert a vector picture to a raster picture in only a few clicks.
To rasterize a picture in Photoshop:
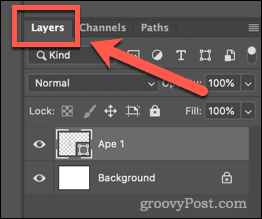
- Make certain the Layers panel is seen. If it would not, press F7 to make it seem.

- Click on on the layer containing the vector picture to be rasterized. Any layer that accommodates vector artwork could have a small form icon within the lower-right nook.

- Duplicate your layer so you continue to have the unique vector picture in case you want it later. To do that, right-click the layer and click on Duplicate Layer.

- Title your layer and click on OK.
- Click on on the attention icon subsequent to your duplicated layer in order that the duplicated picture is now not seen.

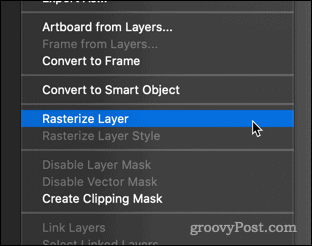
- Now proper click on in your authentic vector layer and click on rasterize layer.


Methods to keep away from rasterization in Photoshop
Whereas rasterizing a picture in Photoshop is simple to do, it could not all the time be the best choice.
As we have already discovered, raster photographs lose some high quality as you resize them. It’s potential to transform raster photographs again to vectors, however you’ll possible lose some picture high quality in consequence.
In some widespread circumstances, you may keep away from rasterization within the first place.
Change fill shade in Photoshop with out rasterizing
A standard motive to rasterize a vector picture is to make use of paint bucket device to vary the colour of the picture. You are able to do this straight on the vector picture utilizing the form instruments as follows:
- Click on on the layer along with your vector picture.
- Click on the Customized Form device.

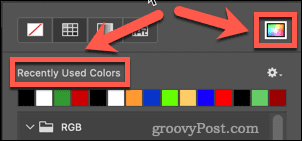
- To alter the colour of the define, click on the field subsequent to Stroke within the choices bar on the high of the display screen.

- Select a shade from current colours or use the colour picker to decide on a brand new one.

- Select your shade and click on OK.

- To alter the fill shade, click on the field subsequent to Fill within the choices bar on the high of the display screen.
- Choose your new shade – your vector picture will now mirror your adjustments.


Turn into a Photoshop professional
Studying how you can rasterize in Photoshop (and how you can keep away from it) is without doubt one of the many expertise that may take you from a Photoshop newbie to a Photoshop professional.
You possibly can discover ways to use presets in Photoshop to hurry up your workflow. Should you’ve all the time wished to have the ability to take away backgrounds from pictures in Photoshop, you too can discover ways to do it.
Should you actually wish to appear to be a professional, you may study among the high Photoshop shortcut hotkeys.
![]()
