Utilizing Refine Edge in Photoshop to change your present choice
Though the Choose menu presents a number of choices, there’s all the time room for enchancment. Photoshop gives a strong possibility for refining an present choice – the Refine Edge command, which could be accessed in two methods. It’s accessible within the choices bar for all choice instruments. You can even entry it by selecting Select > Choose and Masks.
This command could be very intuitive, and its sliders present fast suggestions as you refine a variety. Let’s attempt it.
Open your picture and make an preliminary choice utilizing a software of your alternative. Then click on the Choose and Masks button. within the choices bar. A dashboard containing further controls will seem on the fitting aspect of your workspace. And on the left aspect of your workspace you will notice the Refine Edge Software.
Alter your refinement settings
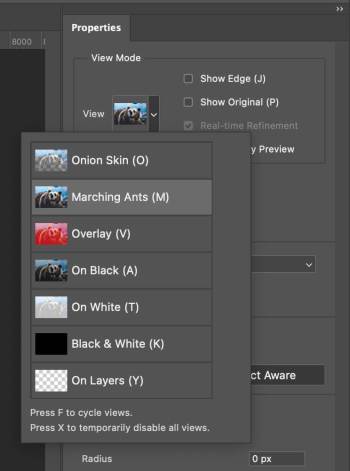
Click on the View button to vary the show mode for displaying the choice (or use the corresponding keyboard shortcut). Strive the completely different modes to see the outcomes:
- Onion Pores and skin (O): Preview your choice with the remaining portion of your picture exhibiting via.
- Marching Ants (M): Shows the choice with the dashed line began.
- Overlay (V): Behaves much like Fast Masks mode.
- On Black (A): Previews the layer over black, which is sweet for gentle edges.
- On White (T): Shows the chosen area towards a white background.
- Black & White (Okay): Simulates a channel view by which the choice seems as a black (clear) and white (opaque) layer (with grey indicating partial transparency).
- On ranges (L): Units the picture above all different layers (or transparency for a single-layer picture). For this train, select the On Layers possibility.
Subsequent, you need to use edge detection to additional clear up the sides. These controls work greatest for areas with partial transparency. For this picture, attempt cleansing up a few of the darkish fringes and any edges of the hair that ought to be partially clear:
- Radius: Drag to refine the choice edge. Strive a price of 8 for this picture.
- Sensible Radius: This selection robotically evaluates the distinction within the edges and tries to appropriate higher transitions.
In case your object lacks uniform hardness and softness, use this selection. Select this selection for this picture (and usually).
The following group of sliders helps you to regulate the sting globally. Experiment with the next sliders:
- Clean: Removes all jagged edges.
- Feather: Softens the sting of the choice.
- Distinction: Will increase the distinction on the fringe of a variety. The Sensible Radius and refinement instruments gives you higher outcomes usually.
- transfer edge: Will increase or decreases a variety. This can be a fast solution to tighten up a tough choice and take away coloration stains.

As soon as you have chosen your settings, go to the Refine Edge Software on the left aspect of your workspace. Right here you need to use the Refine Edge Brush Software (R) to brush over particular areas which will want refinement. You possibly can select the comb settings within the choices bar on the prime of the display.
In properties you need to use decontaminate paints Apply coloration correction. This may take away any coloration spills from the background onto the chosen object.
Save your settings and also you’re carried out!
Within the properties, it’s also possible to create a preset primarily based on these settings in the event you anticipate comparable work that requires comparable changes.
Lastly, it is advisable decide what Photoshop will do with the brand new choice. The alternatives are many (and helpful):
- Choice: Creates an energetic choice.
- Layer Masks: Creates a non-destructive masks that creates transparency within the highlighted layer.
- New layer: Creates a brand new layer with solely the chosen space.
- New layer with layer masks: Creates a brand new layer with solely the chosen space masked. That is essentially the most versatile possibility. Select this selection for this doc.
- New doc: Creates a brand new doc with solely the chosen space.
- New doc with layer masks: Creates a brand new doc with the chosen space masked.
After selecting your output possibility, click on OK.
