Learn how to Render in Reaper
Reaper, a robust and versatile digital audio workstation (DAW), has develop into a favorite amongst music producers and sound engineers for its environment friendly workflow and in depth function set.
Whereas composing and recording music is step one within the artistic course of, rendering and exporting your ultimate undertaking is equally essential. On this tutorial, we’ll delve into the artwork of Reaper rendering.
In our free Reaper course, you’ll be taught the fundamentals of Reaper with Dave Bode. On this fast lesson, Dave will discuss you thru render audio in Reaper, the place you will be taught a number of the fundamental however important modifying instruments. Let’s get began!
Learn how to Render in Reaper
After you have made all your edits and also you get your undertaking sounding implausible, it is gonna be time to render out your undertaking in order that different individuals can hear it.
Go to File > Render, which additionally has the keyboard shortcut Ctrl+Alt+R to begin the method.


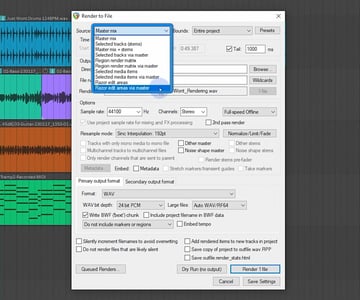
The primary time that you simply take a look at this render window this could really feel perhaps a bit of overwhelming. However I am simply going to attract your consideration to some of the areas that shall be very useful when it comes time to do some Reaper rendering.


The primary is that this Supply choice. You possibly can click on this dropdown and you’ll see there are a bunch of various choices for rendering issues just like the stems, the grasp combine plus stems, and way more.
For many of your initiatives you need this set to the default, which goes to be the grasp combine.


Subsequent, you wish to ensure that your undertaking goes to render on the applicable begin and finish instances. Typically you will have a undertaking, the place you might not essentially need it to begin rendering from the very starting.
To do that you must create a time choice. One of many simplest way to try this is to make use of markers.


This makes it very easy to make a time choice by clicking and dragging together with your mouse to focus on the house between the 2 markers. Then you possibly can simply select time choice from this drop down menu.


You may also identify you makers by deciding on them and typing =START for the beginning of your footage and =END for the tip.


Then choose Customized Time Vary and it’ll choose the beginning and finish instances based mostly on the markers you’ve got created.


Subsequent let’s take a look at this output part proper right here. First, we now have to set an output listing. When you click on on Browse you possibly can add a location for the place you wish to save your file.


Subsequent, you must create a reputation on your file.


Or you need to use Wildcards. When you click on on Wildcards, you will note that there’s a ton of various wildcards which you could insert for the file identify which is able to robotically identify the file in line with these properties.
So for instance in order for you your file named with the undertaking, you simply choose that wildcard. Or in order for you it to be one thing like your “project_the date”, you are able to do that as nicely.


Within the output part there are various choices, do not let this overwhelm you as a result of there are actually only some choices that you must concentrate on.
The primary is pattern charge, by default this ought to be set to no matter your undertaking was set to. Proper now it is 44,100 hertz which is the default pattern charge for music. Nevertheless you possibly can change it to 48 kilohertz if you happen to work on a mix of music, video initiatives, podcasts, and audiobooks as 48 kilohertz just about works for the whole lot.
Additionally keep in mind, that if you’re rendering to someplace particular, like Audible for instance you wish to just remember to are matching their supply specs precisely.


So the following part you wish to take a look at is Channels. By default this shall be chosen to stereo, but when it is one thing like an audiobook you might wish to change this over to mono.


And by the best way, if you will be delivering one thing in mono, please just remember to take heed to your undertaking in mono. Which you are able to do by clicking on this button proper right here, this can collapse the stereo picture right down to mono.
if it is one thing easy like a podcast with only one microphone then it ought to sound precisely the identical. However in case you have any stereo audio in your undertaking, you are going to wish to hear what that appears like in mono in case there may be any sort of part cancellation when the left and the best channels get mixed collectively.
However for many initiatives you are going to wish to select Stereo.


Click on on the Normalize button if you wish to just remember to are outputting your recordsdata that meet loudness specs for issues like YouTube, and Spotify, and Audible and so forth.
From right here you possibly can can enter the precise specs for the supply platform.


In case you are exporting one thing like an MP3, you possibly can click on on the Metadata button which lets you add every kind of metadata for the ID3, which is supported by MP3, and WAVs, and AIFF.


Subsequent, you’ve got some choices for output. You possibly can see you’ve got a Major output format and a Secondary output format, which by default isn’t chosen. What this implies is that once you render, you possibly can output two completely different file codecs.
So if you happen to needed to render a WAV, after which as a secondary, you needed to do one thing like an MP3, you are able to do that proper right here.


A pair extra choices down right here that you simply may wish to try. A kind of is silently increment filenames to keep away from overwriting, this is usually a actually useful choice if you’re rendering completely different variations.
And also you wish to just remember to do not unintentionally overwrite a earlier model, as a result of if you happen to do not change the file identify, Reaper will render overtop of it.


As soon as that is achieved Reaper rendering, you will see there are a couple of helpful buttons on the backside. You possibly can launch the file, you possibly can open the folder and you’ll open the Media Explorer all inside Reaper.


You possibly can even change the statistics that Reaper exhibits you throughout Reaper rendering.


Conclusion
And that is just about it, now you understand how to render your initiatives utilizing Reaper rendering. I hope you discovered this tutorial useful and that you’ve got realized some new suggestions and methods that you need to use on your personal initiatives. See you subsequent time!
About This Web page
This web page was written by Jonathan Lam from the transcript of a course by David Bode. Dave is an professional on video and audio manufacturing. Jonathan is a digital artist, graphic designer, illustrator, and animator. The web page was edited by Gonzalo Angulo. Gonzalo is an editor, author and illustrator.
