5 Steps To Create Your First Fb Advert

With a little instruction, anyone can create their first Facebook ad.
Yes, we mean everyone. New marketers or experienced marketers who just dip their toes into the Facebook world can be very successful on Facebook. The key is to set up your first ad, click "Publish" and immediately set your learning limit. 🧢
Every ad you create on Facebook provides an opportunity to learn what works best for your Facebook audience and what you can do BETTER next time.
So let's start by publishing your first Facebook ad so that you can become a Facebook marketer. (We believe in you!)
Here are the 5 steps to create your first Facebook ad.
# 1: Find out your offer and CTA
The first step in creating a Facebook ad is knowing what you are promoting. What is your offer and how do you ask people to shop? Your offer can range from asking users to click through to your website to asking them to take out their wallets and buy your items.
Here are some examples of different types of offers:
- Lead magnet
- Discount code
- Buy one get one
- Free trial period
Finding out your offer depends on the goal of your Facebook ad. Would you like more visitors to your website? Would it be ideal if you expanded your email list? Is the main goal to get more sales?
For example, if you want to attract more visitors to your website, you want to offer a lead magnet, a discount code, or a purchase. You will receive an offer that motivates the person to see your ad to check the details on your website.
If you want to expand your email list, you'd like to offer a lead magnet that would require a person to enter their email address on a form so that you could send them the e-book, video, course, and so on then add them to your email funnel).
If you want to generate more sales, you want to offer a discount code or a buy-one-get-one offer that allows the person to click through your ad to your website so they can buy your products.
Here are two examples of DigitalMarketer offers from our Facebook ads. The first offering aims to get people to come to our website and read our article How to Find Authors for Your Blog.
Anyone reading this article will see 2 calls to action for our latest promo. The promo in our blog posts generally asks for a reader's email address to get a lead magnet, subscribe to our DM Insider newsletter, and sometimes buy a low deal (but this is not very often the case) Case).
There are three main goals behind this Facebook ad:
- Show our content to a cold audience that didn't know the DigitalMarketer brand (Phase 1 of the Customer Value Journey).
- Let readers become leads by signing up to receive the promo
- Pixel the people who clicked on our website so that we can target them again with ads
Here is another ad that we run by offering a free trial of our Lab membership.
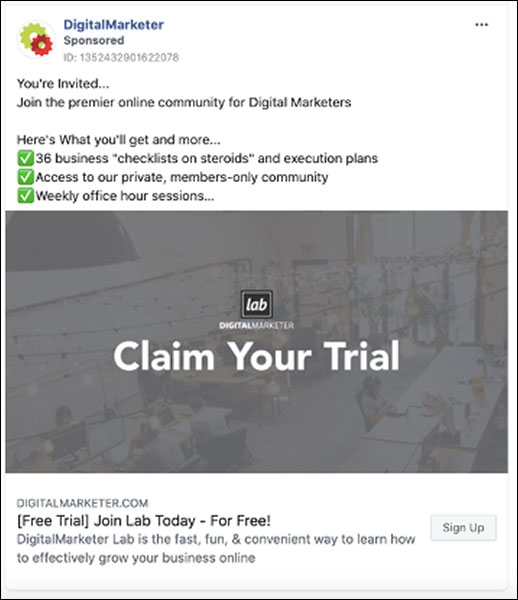
A person who clicks on this ad will be directed to our "Laboratory Trial Claim" landing page, where they can read more information about our laboratory membership. There are 2 goals for this Facebook ad:
- Get free trial subscriptions for Lab
- Pixel the people who visited this site (they are very warm leads now)
Once you've looked at your goal and figured out what is best for that goal, you can find out what your call to do is. This is fairly easy since you already know what action you need to take to achieve your goal.
For example, if we want someone to read our article, our CTA is “More Information”. If we want someone to sign up for a free trial of Lab, our CTA is “Sign Up”.
If we asked someone to buy a product, our CTA would be "Buy Now".
Okay, now that we have our offer and CTA, we can start working on the ad motif.
# 2: Write your copy and make your visuals
With your offer and CTA in hand, it's time to put together the copy and graphics to help you get your point across. This is your ad motif and a crucial, crucial, crucial part of your ad. If your copy, graphic, or both are disabled, you won't get the results you want.
Before you start writing your copy and taking your pictures or recording your video, you need to figure out where to display this ad.
- Would you like it to be an ad on Facebook and Instagram feeds?
- Will it be an Instagram story?
Knowing what your ad will look like will tell you what copy you need and what your visual presentation should look like.
Let's start by making an A + copy that will make your customer avatar think: "Hey … that's exactly what I'm looking for."
Here are some proven copywriting strategies:
The power of one
This copywriting strategy uses a good idea, core emotion, addicting story, or inevitable response to get a person's attention. Examples for this are:
Good idea: How to use neuromarketing in your Facebook ads
Core feeling: A garbage truck with plastic is thrown into the ocean every minute.
Fascinating story: A customer story that talks about the difference a product has made in life, business, etc.
Inevitable reaction: you will laugh when you see how often you have made this mistake while writing text
Advantages over functions
Don't use your ad space to talk about the features of your product. These properties inspire you, but not your customers. Your customers enjoy the ADVANTAGES of these functions.
For example, a productivity management tool shouldn't highlight the sleek, user-friendly interface – it's a feature. You should talk about how much time someone saves using their tool. This is an advantage.
Use FOMO, urgency and scarcity
Copywriting uses these emotional triggers to show someone why they should buy a product, sign up for a product, or sign up.
- With FOMO, people feel excluded and want to get on the car
- Urgency motivates someone to take the CTA as soon as possible
- The scarcity shows a lack of products, possibilities etc. and leads to a faster conversion
When you use these triggers, you want to make sure that you don't spread negative or fearful news. As a marketer, you have a responsibility to empower people – and not to get them to take the desired action. For example, when we market our Lab membership, we never say, "If you don't join Lab, you will be a terrible marketer."
This spreads negativity and fearful news that someone needs our product to be a great marketer. That is not what we are about.
Instead, we say, "Join thousands of other marketers learning the best marketing strategies available today." This creates a FOMO not being one of these thousands of marketers without making anyone feel bad.
Let us now concentrate on your pictures, whether it is a single picture or video, a carousel or a collection of pictures. Remember that there will be a copy on your picture. When you publish a product image, you can set the price of the product on the image.
For the most part, you can assume that people will see your picture first and then read your copy. So you should pay a lot of attention to how your image represents your offer and your brand.
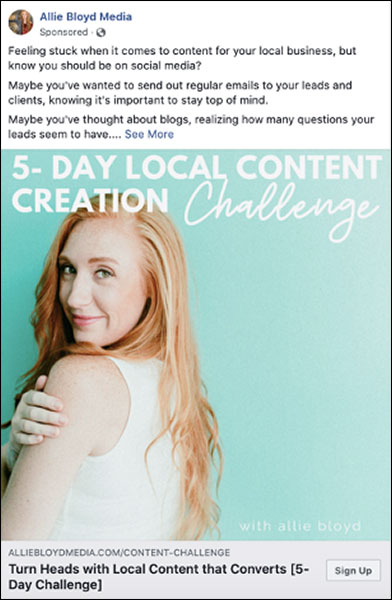
For example, look at the picture Allie Bloyd uses.
The first thing you notice is the text "5 Day Local Content Creation Challenge". The second thing you notice is Allie herself. This is an excellent example of using your ad visualization to display your offer (in Allies it is the 5 day local content creation challenge) and creating it for the brand. For Allie, on-brand means bright colors and a bright image. It is you too!
Phew, now that we've gone through the creative process behind your Facebook ad, it's time to dive into Facebook Ads Manager and publish it!
# 3: Create a campaign
The first part of creating an ad in Ad Manager is to create a campaign. In this part of your ad creation, you will:
- Choose your destination
- Decision to run A / B tests
- Enable or disable campaign budget optimization (CBO)
Let's go through this briefly.
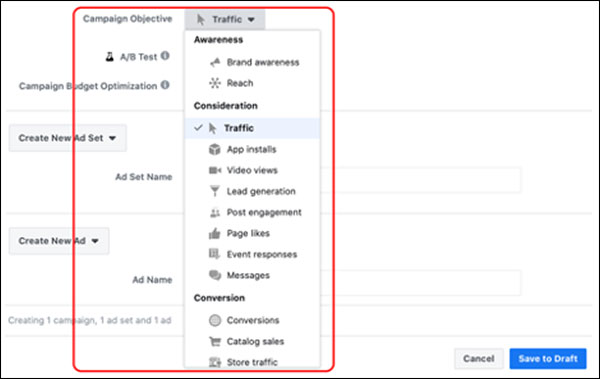
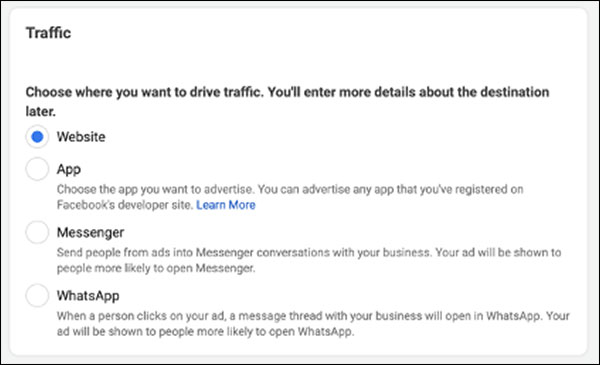
# 1: Choose your destination
This will go back to the goal we talked about in step 1. What is the goal of your ad? Depending on this goal, choose your goal. If you choose the destination here, tell Facebook that a win looks like this to you. If you want users to click on your website, you can tell Facebook by clicking the "Traffic" target that this is the target of your ad.
Here are all the options for your campaign goals:
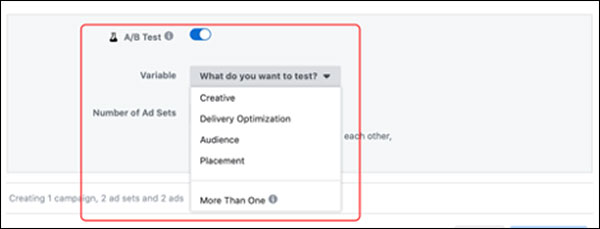
# 2: A / B tests
Enabling A / B testing simply means that you’re publishing more than one ad with the same goal. Just like running A / B tests in email funnels or landing pages, you want to see which ad performs best.
If you want to run A / B tests, just turn on the switch and choose how you want your test variable to look.
# 3: Optimizing the campaign budget
Campaign Budget Optimization (CBO) spreads your budget across all ad sets in your campaign. Depending on which ad set performs best, more of your budget will be spent on the ads in that ad set.
You can enable this if you want to have multiple ad sets with different ad themes. Once you activate it, Facebook will ask you how high your campaign budget is, and this budget will be automatically shifted by ad sets based on your performance based on your campaign goal.

And just like that you have a campaign! 🎉
# 4: Create an ad set
You made it to the penultimate step in creating a Facebook ad! Let's take a sip of coffee together – mmm, magic bean juice. With the caffeine flowing through our veins, we are ready to create this ad set, the ad (s), and then click PUBLISH!
Here's what to do when you create your ad set:
- Choose your conversion event
- Enable / disable dynamic creation
- Select budget and schedule
Choose your audience
- Choose your placements
- Optimization and delivery
Let's go through each option.
# 1: Conversion event
The conversion event that you can choose is based on the campaign goal you selected in step 3. For example, if you clicked Traffic as the campaign target, you see the following as options for your conversion event.
# 2: Dynamic motif
Dynamic Creative allows Facebook to take control of various variations of your ad using the copy and graphics you upload for this ad set.
- When you enable the dynamic creative, Facebook will show variations of the ads and graphics that you have made available to your audience, and then determine which variation is the most successful to achieve the campaign goal
- If you don't enable the dynamic creative, Facebook will use the ad copy and graphics you upload for each ad
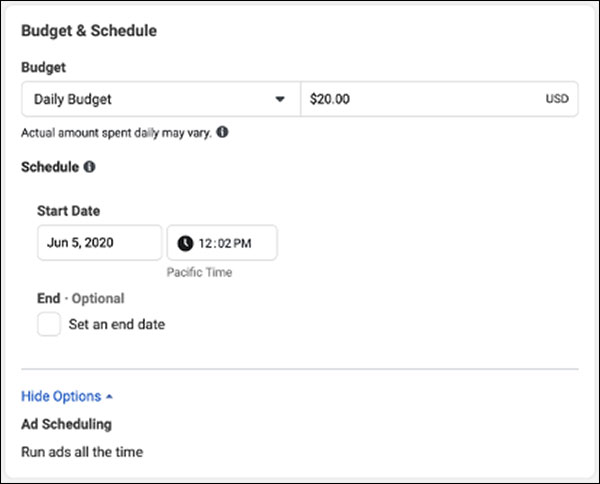
# 3: budget and schedule
If you were nervous that Facebook would send you a massive bill for messing up your campaign setup, you don't need to worry about this anymore.
In this part you set your daily budget for each ad set. For example, you can say that you want to spend $ 20 a day. If your ad set contains two ads, spend $ 10 per day for each ad unless you've chosen to optimize your campaign budget. In this case, Facebook spends the budget on the ad that performs best.
You can also choose your schedule in this part of the Ad Manager. You can set your start date and end date (see below). End dates are optional because you can choose to have your ad appear indefinitely until the conversion ends.
# 4: audience
Okay, time to decide who will be invited to your Facebook party! This is a very important part when creating your Facebook ad. If it doesn't appear to the right people, you won't get the conversions you hoped for.
You choose your audience based on:
- Location
- Age
- gender
- Interests
- languages
- links
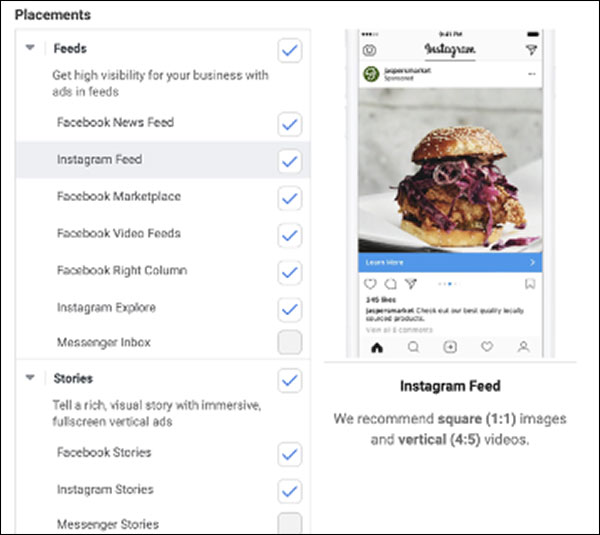
# 5: placements
Now you need to choose where to show the ad. This affects both the platform and the position within the platform where it is displayed. For example, you can choose to only show your ad on Instagram stories. You can also use your ad as a feed post that appears on Facebook and Instagram.
Facebook will ask you if you want automatic or manual placements. Automatic placements allow Facebook to place your ad in feeds, stories, apps and websites, etc. With manual placements, you can choose which platform and on which platform your ad should be placed.
Here are the first options that appear when you select Manual Placements:
# 6: optimization and delivery
You optimize for an event within your ad set. This option allows you to optimize the goal selected in step 1 or different events per ad set. Here are the options for the events for which you can optimize your ad set:
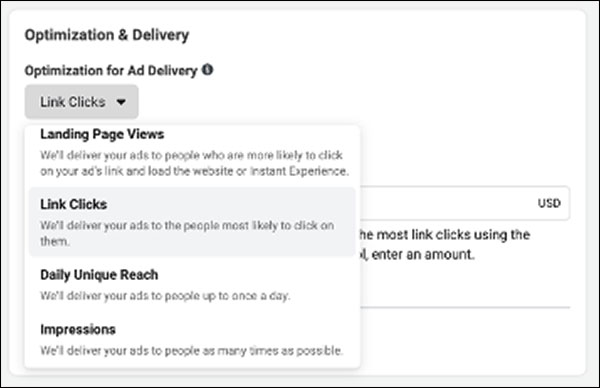
Depending on the optimization you choose, you can set a cost or bid control that sets a budget for the event. This is optional.
And just like that – we have an ad set !!
This means that you only have to do one thing: Place ads 🤩
# 5: Create an ad
The final step in creating your first Facebook ad is … to actually create the ad! Now that we've done all the background work, it's time to create the part of the ad that our audience will see. Get your copy and your pictures – it's time to plug and play.
How to create your ad:
- Choose identity
- Choose Ad Setup
- Create an ad creative
- Set up tracking
- Publish
Let us go through this briefly again.
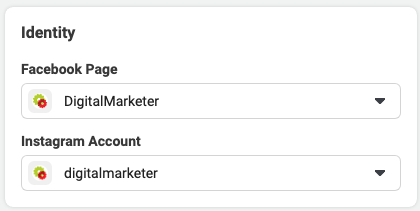
# 1: identity
Identity is the Facebook page, Instagram profile or the person who will publish the ad. If you have a business Instagram account, it will be linked to your Facebook page.
# 2: Ad setup
You can choose between two options in the display setup:
- Single image or video
- carousel
A carousel display contains multiple images or videos that someone can scroll through. Here is an example from DrinkMud.

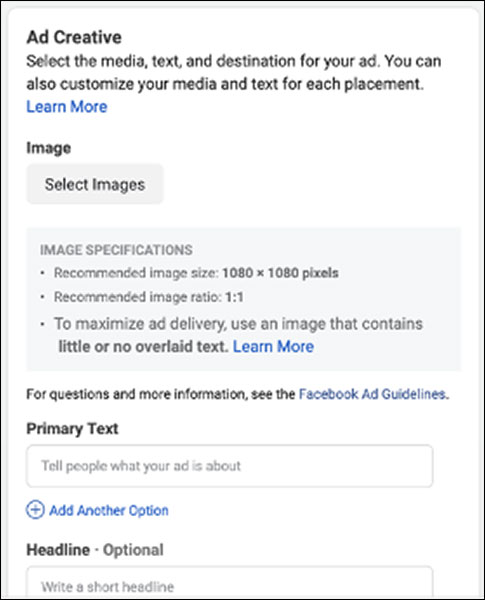
# 3: Ad motif
Here you can copy and paste your copy and upload your pictures or videos. You have options such as primary text, heading (optional), description, website URL and call to action.
As you enter the information above, your ad will appear on the right. Take the time to preview the ad in all of its placements to make sure it looks good. If this is not the case, you can return to your ad set (step 4) and deactivate this placement using the manual placement.
# 4: persecution
We wouldn't be a marketer if we didn't plan to track the success of our ads! In the last step of setting up your Facebook ad, choose where you want to track conversions.
All of your ad's results are stored in your ad manager so you can view your campaign's budget, results, reach, impressions, cost per result, amount spent, frequency, and unique clicks (depending on what information is relevant) are to your goal).
# 5: PUBLISH!
Now it's time to click the pretty green button in the right corner and set your ad to "Live". We don't want to be completely anti-climactic here, but you'll have to wait for Facebook to approve your ad before it officially goes live.
However, once that happens, your ad will be visible to the world.
This is the basis for creating Facebook ads. There are tons of strategies and tips for using Facebook ads that you can implement if you become familiar with the platform and build your audience.
We just want you to remember one thing: even if your Facebook ad "fails" because it didn't reach the campaign goal you're looking for, it's actually not a mistake. You’ve learned something that’s brought you closer to your desired traffic and conversions.
Good luck out there! We'll see you in the feed 😊
